

7 Steps to Create Epoxy Resin Art
Epoxy resin art has gained immense popularity recently due to its versatility and stunning results. This unique medium allows artists and enthusiasts to create vibrant, glossy, and durable artworks. Whether you are a beginner or an experienced artist, understanding the fundamental steps for working with epoxy resin can help you achieve remarkable outcomes.
But where do you begin? How do you build an interest in resin art and determine the right techniques for your creations? In this blog, we will guide you through the process of using epoxy resin art in just a few easy steps. If you want to delve deeper into resin art, consider enrolling in a resin art course.
Seven Easy Steps to Use Epoxy Resin Art
Learning this medium is known to be a fun and rewarding experience. Following these seven simple steps, you can create stunning resin artwork that impresses your mates.
Step 1: Prepare Your Workspace
Before you begin your art project, it is essential to prepare your workspace properly. Here are some key steps to follow:
- Clean and Organise: Remove any clutter and ensure your work area is ready to use and dust-free. This will help prevent unwanted particles from getting trapped in your resin.
- Cover and Protect: Use a drop cloth or plastic sheet to shield your work surface. Epoxy resin can be messy, and this will save your area from any spills or drips.
- Ventilation: Ensure your workspace is well-ventilated. Epoxy resin can emit fumes during curing, so working in a well-ventilated area or room or using a respirator if needed is important.
- Safety Measures: Wear protective gloves, goggles, and a mask to protect yourself from any potential harm. This substance can be toxic, so taking safety precautions is crucial.
Step 2: Gather Your Materials
Before you start your project, gathering all the requirements is important. Here is a list of essential items you will need:
- Epoxy Resin: Choose a high-quality one that suits your project. Different resins are available, such as clear, coloured, or UV-resistant resin.
- Hardener: A catalyst reacts with the epoxy resin to create a chemical bond. Make sure to use their correct ratio as specified by the manufacturer.
- Mixing Cups: Use disposable cups to measure and mix the epoxy resin and hardener. These cups are easily available at art supply stores.
- Stir Sticks: Mix the resin and hardener thoroughly using plastic or wooden stir sticks. Avoid using metal stir sticks, as they can cause unwanted reactions.
- Protective Gear: Protecting yourself during the resin art process is essential. Wear gloves to prevent direct contact with the resin, and use a respirator mask to avoid inhaling any fumes.
- Painting Surface: Choose a suitable painting surface for your art project. Wooden panels, canvas, or coasters can work well as a base for your artwork.
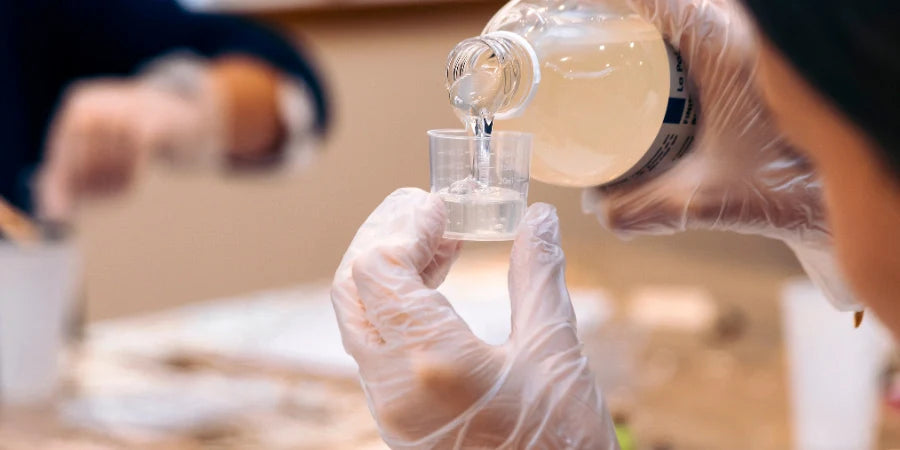
Step 3: Mix the Epoxy Resin
Epoxy resin is a two-part mixture consisting of resin and hardener. These two components must be mixed in the correct proportions to achieve the desired results. Here's how you can do it:
- Measure: Start by measuring equal amounts of them. Follow the instructions provided by the manufacturer to ensure accurate measurements.
- Pour: Once you have measured them, pour them into a clean mixing container. Use a container with high sides to prevent spills.
- Mix: Combine these two with a stir stick or a wooden craft stick. Stir slowly to minimise the formation of air bubbles. Make sure to scrape the sides and bottom of the container to ensure all the components are well-mixed.
[Pro Tip: Optional: If you want to add colour, this is the time to do it. You can use resin dyes, pigments, or acrylic paints to create stunning, vibrant colours. Add a small amount of colourant to the mixed resin and stir gently until the colour is evenly distributed.]
Step 4: Add Colour
You can add pigments or dyes to create beautiful and vibrant colours in your artwork if desired. Add some pigment and stir well until you achieve the desired colour. To add colour to your epoxy resin artwork, you have several options.
- Pigments: Using epoxy resin pigments or dyes is a popular choice among artists. These concentrated colourants can be easily mixed to create custom hues. Experiment with different colour combinations to achieve the desired effect.
- Acrylic Paints: Another way to introduce colour is by using these paints. Mix a small amount of them with the resin before pouring. This technique allows for more control over colour blending and creates unique patterns.
- Alcohol Inks: For a bold and vibrant look, consider using alcohol inks. These intense, fast-drying inks can be dropped or poured onto the resin surface, creating stunning abstract designs.
Step 5: Pour the Resin
Once your epoxy resin is mixed and coloured (if desired), it's time to pour it onto your chosen surface. Whether using silicone moulds or a canvas, ensure it is clean and free from dust or debris. Slowly pour the substance onto the surface, allowing it to spread naturally. While pouring it can be a rewarding experience, it is important to address common issues that may arise during the process. Here are some troubleshooting tips:
- Bubbles and Surface Imperfections: Mix it slowly to prevent bubbles from forming, and avoid whisking or stirring vigorously. You can also use a heat gun or a torch to remove any bubbles that appear on the surface gently. Additionally, ensure that your workspace is free from dust particles that may cause imperfections.
- Uneven Pouring: Uneven pouring can result in an imbalance in resin thickness, leading to an unbalanced appearance in your artwork. To achieve an even pour, start pouring in the centre and gradually work your way towards the edges, allowing the resin to spread and level itself naturally.
Step 6: Remove Air Bubbles
After pouring the resin, you may notice small air bubbles trapped within the mixture. A heat gun or blow torch at a low setting removes these bubbles and creates a smooth surface. Gently pass the heat over the resin, allowing the bubbles to rise and disappear. To avoid this issue, removing air bubbles before they cure is crucial. Here's how you can do it:
- Mix the resin according to the manufacturer's instructions. Be sure to follow the recommended ratio to achieve the best results.
- Let the mixture sit for a few minutes to allow any large air bubbles to rise to the surface.
- Using a heat gun or a handheld torch, carefully move the flame over the surface of the resin. This process will help to burst the air bubbles.
- Alternatively, you can gently blow on the surface using a straw. The airflow will disturb the surface tension and release the trapped air bubbles.
Read Also - Group Booking For Resin Tray With Flower
Step 7: Cure and Finish
Typically, epoxy resin takes around 24 to 48 hours to cure fully. During this time, protect your artwork from dust and debris. You can cover it with a dust-free enclosure or a larger container. Once it has cured, remove any protective covering and inspect your artwork for imperfections.
Now, you can add any final touches to your artwork. This could include sanding the surface to achieve a smooth finish, applying a protective varnish, or framing the piece to showcase its glory. These finishing touches will enhance the overall appearance and ensure the longevity and durability of your epoxy resin art.
Read Also - How Resin Art Can Help Your Kids For Stress Relief In Life?
Conclusion
Using epoxy resin art is a fun and creative way to express yourself. Firstly, it is important to prepare your workspace. Clear any clutter, and make sure you have a clean and level surface to work on. Gathering all the necessary materials. Once you have everything ready, you can begin mixing the epoxy resin. Follow the manufacturer's instructions carefully and thoroughly combine the resin and hardener.
The next step is Adding colour and pouring it into your chosen mould or surface. Removing air bubbles is essential to achieve a smooth finish. Finally, allow the resin to cure and finish off your artwork. This may take a few days, depending on the brand and instructions. Once complete, you'll be left with a stunning epoxy resin art piece. To learn more about epoxy resin art and explore further techniques, visit Arts Shala's website and Contact Us for more information.


