

Create Stunning Epoxy Resin Geodes: A Step-by-Step Guide
Resin geodes have become incredibly popular in crafting, and it's easy to see why. These beautiful artworks imitate the natural wonder of geodes with their bright colours and detailed designs. Making your resin geodes is a fun and satisfying project and lets you add a personal touch to your home decorations or gift ideas.
The appeal of making your epoxy resin geodes lies in the endless possibilities for creativity. You can choose your preferred colours, shapes, and arrangements of crystals. Each artwork becomes a unique representation of your artistic journey. Whether you're an expert artist or just starting, resin geode-making offers a fun and fulfilling way to unleash your creativity.
If you're new to resin geodes, joining a resin art workshop can be a great way to gain knowledge and hands-on experience. So, if you're ready to start a mesmerising journey of creating your own epoxy resin geodes, let's get into the step-by-step guide that will help you bring this captivating artwork to life.
Essential Materials to Make Epoxy Resin Geodes
When creating your epoxy resin geodes, having the right materials is essential for achieving the best results. Here are the necessary materials you'll need:
- MDF Wood: This will serve as the base for your resin geode. Choose a sturdy piece of MDF wood that is smooth and free from imperfections.
- Crystal Clear Epoxy Resin: This main component will make your geode look glass-like. Opt for a crystal clear epoxy resin with a long working time, allowing you to work on your design without feeling rushed.
- Mixing Containers: Use disposable plastic or silicone measuring cups to mix your resin and hardener. It's essential to use separate containers for each colour to avoid cross-contamination.
- Stirring Sticks: Choose wooden or silicone stirring sticks to mix your resin thoroughly. Avoid using metal utensils as they can introduce air bubbles into the mixture.
- Mica Powder: This pigment powder will add vibrant colours to your resin geode. Select various mica powder colours that complement each other and create an eye-catching design.
- Crystals: To enhance the geode effect, gather several tiny crystals in different shapes, sizes, and colours. Popular choices include quartz, amethyst, and agate slices.
Step 1: Choosing and Preparing Your MDF Wood Surface
The MDF (Medium-Density Fiberboard) wood base is perfect for making resin geodes because it's smooth and strong. Here's what you need to do with the MDF wood base to give a flawless finish that will serve as the foundation for your resin geode.
- Start by sanding it to remove any rough edges or imperfections.
- Then, seal the surface with a primer or sealant to ensure a smooth finish for the resin application.
Step 2: Adding Colours with Mica Powder
One of the critical elements in creating epoxy resin geodes is adding vibrant colours to mimic the natural hues in real geodes. Mica powder is popular for colouring resin because it produces a shimmering effect. Here's how you can incorporate mica powder into your resin geode:
- Start by preparing your epoxy resin mixture according to the manufacturer's instructions. Make sure to mix it thoroughly and remove any air bubbles.
- Once your resin is prepared, it's time to add the mica powder. Choose colours that contrast with each other and will enhance the overall design of your geode. For example, consider using shades of blue and purple if you're going for a cool-toned geode.
- Sprinkle a small amount of mica powder onto the surface of your resin mixture. You can gently blend the powder into the resin with a toothpick or a stir stick.
- Continue adding mica powder in different areas of your resin mixture, experimenting with various colour combinations and patterns. Remember, less is more - start with a small amount and gradually add more if needed.
- Use a heat gun or a torch to properly remove any air bubbles that may have formed during mixing. This will result in smooth and flawless finish for your resin geode.
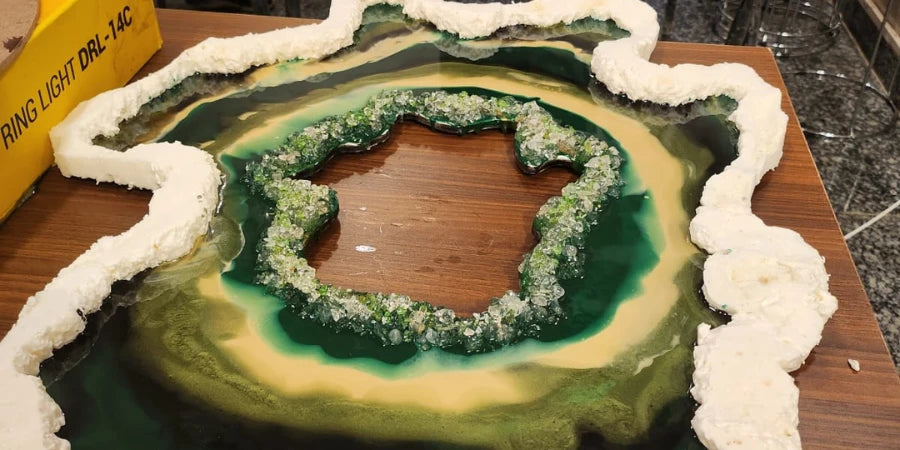
Step 3: Enhancing the Geode Effect with Crystals
Crystals play a crucial role in creating a realistic and captivating geode structure. They add depth and sparkle to your resin geode, making it stand out. Follow these steps to incorporate crystals into your artwork:
- Select an assortment of crystals that complement the colours and style of your resin geode. You can choose crystals like quartz, amethyst, or citrine, depending on the desired aesthetic.
- Before pouring resin over the base, arrange the crystals on the surface according to your desired design. Consider placing them in clusters or following natural patterns found in real geodes.
- Slowly pour the resin mixture over the crystals, ensuring they are fully covered but still visible through the translucent resin. Use a toothpick or a stir stick to move and gently adjust the crystals if needed.
- Allow the resin to cure as described in the manufacturer's guidelines. This will ensure it hardens securely and adequately holds the crystals in place.
Step 4: Creating Depth with Geode Lines and Veins
Geode lines and veins add depth and appeal to your resin geodes. They mimic the natural patterns in real geodes, giving your artwork an authentic look. Follow these steps to create stunning vein-like patterns using gold mica powder mixed with resin:
- Start by outlining the shape of your geode using a pencil or painter's tape on your base surface. This will act as a guide for creating vein-like patterns.
- Mix a small amount of gold mica powder with resin to create a metallic mixture. This will serve as the “veins” in your geode.
- Carefully apply the gold resin mixture using a toothpick or a small brush along the pencil lines or within the painter's tape outline. Create curved and flowing patterns to mimic the natural formation of geode veins.
- Once you've applied the gold resin mixture, gently remove the pencil lines or painter's tape while the resin is still wet. This will create clean edges and enhance the overall appearance of your geode.
Step 5: Finalising the Geode Artwork
To ensure your resin geode is flawless and ready to display, follow these steps to remove any imperfections and achieve a smooth finish:
- After the resin has fully cured, inspect the surface for any air bubbles that may have formed during the curing process. Use a heat gun or a torch to gently warm the surface and allow trapped air bubbles to rise and pop.
- If any rough or uneven areas are on your geode, you can use sandpaper or a sanding tool to smooth them out. Start with rough grit sandpaper and progressively move to finer grits for a polished finish.
- Once you're satisfied with the smoothness of your resin geode, clean it with a mild soap solution and water to remove any dust or residue from sanding.
Conclusion
Following the information and steps in this blog, you can achieve a professional-looking epoxy resin geode with a smooth and glossy finish that showcases the vibrant colours, crystals, and intricate geode lines you've created.
Remember, practice makes perfect, so don't be disappointed if your first attempt isn't flawless. You'll refine your skills and develop your unique style with each new geode you create. Enjoy the process, and let your creativity shine through!
For a more detailed understanding of creating resin geodes and other exciting resin arts and crafts, Contact Us on Arts Shala today, where you can gain hands-on experience and learn from expert instructors.


