

DIY Epoxy Resin Geode Wall Mirror Tutorial
An epoxy resin geode wall mirror is a striking and one-of-a-kind home decor item that beautifully showcases the allure of natural geodes. It's a mirror where the reflective surface is framed by a gorgeous, three-dimensional geode design made using epoxy resin. Epoxy resin is a transparent material that hardens into a glossy, castable plastic. By colouring and manipulating the resin, you can create the illusion of sparkling crystals and swirling colours reminiscent of a geode formation.
This DIY tutorial illustrates how to create a stunning epoxy resin geode wall mirror. This project is a fun and creative way to express your style and a budget-friendly option for adding a beautiful statement piece to any room in your home. Consider taking a resin art workshop for even more in-depth learning and exploring advanced techniques.
Why Choose an Epoxy Resin Geode Mirror?
Each mirror is one-of-a-kind due to the variations in the resin pouring process. You'll have a truly bespoke piece of art. The geode design adds a touch of natural elegance and sophistication to any space. You can customise the size and colour scheme and even add embellishments to match your existing decor.
Tutorial to Create Epoxy Resin Geode Wall Mirror
Bring the dazzling beauty of geodes into your home with a one-of-a-kind epoxy resin geode wall mirror! This tutorial will guide you through the process step by step. Wear gloves, safety glasses, and respirators to avoid skin irritation and fume inhalation. Work in a well-ventilated area.
Materials
- Mirror (size and shape of your choice)
- Epoxy Resin Kit (including Part A and Part B resin)
- Resin Dyes (multiple colours to create your geode design)
- Rubbing Alcohol (for cleaning and manipulating the resin)
- Mixing Cups and Stir Sticks
- Heat Gun (optional for removing air bubbles)
- Painter's Tape
- Plastic Drop Cloth
- Sandpaper (optional for smoothing edges)
- Optional embellishments: crushed glass, glitter, faux crystals
Instructions
- Prepare Your Workspace: Cover your platform with a plastic drop cloth to avoid damaging it from spills.
- Clean the Mirror: Thoroughly wipe the mirror's reflective surface with rubbing alcohol to remove dust, fingerprints, or oils. A clean surface ensures proper resin adhesion.
- Mask the Mirror: Use painter's tape to create a clean border around the mirror's edge. This will prevent resin from bleeding onto the reflective surface.
- Prepare the Resin: Follow the guidelines provided in your resin kit and portion out the same quantities of Part A and Part B resin into individual mixing cups as directed.
- Mix and Colour the Resin: Pour Part A resin into one of the mixing cups. Then, add drops of your chosen resin dyes to achieve the desired geode colour scheme. Blend the tinted resin completely by stirring it well, making sure to scrape the cup's sides and bottom for uniform color dispersion. Repeat this process in separate cups for additional colours you plan to use.
- Creating the Geode Design: Different techniques exist to make the geode formations. Here are two common approaches:
-
Layered Pouring
- Base Layer: Pour a thin layer of clear resin onto the mirror frame, covering the area you want your geode design to occupy. Let this layer partially cure according to the resin's instructions (usually a tacky stage).
- Coloured Layers: Once the base layer reaches a tacky stage, carefully pour different coloured resin mixtures onto it, allowing them to pool without thoroughly mixing. You can gently swirl the colours with a toothpick for a more organic look.
- Top Layer: After creating your desired geode pattern, pour a clear resin layer to encase everything.
-
Tilting and Swirling
- Pour a Clear Base: Pour a clear resin layer onto the mirror frame, covering the designated geode area. Let it cure slightly (refer to resin instructions for the tacky stage).
- Coloured Accents: Pour a small amount of coloured resin onto the tacky base layer. While the coloured resin is still wet, tilt the mirror at different angles to create streaks and swirls that resemble geode formations.
- Repeating and Layering: Repeat step 2 with other coloured resins to build up the geode design. You can also add a clear layer between coloured pours for better depth.
- Adding Embellishments (Optional): While the resin is still wet (but not dripping), use tweezers to sprinkle crushed glass, glitter, or tiny crystals onto the geode design for extra sparkle and texture.
- Finishing Touches: Reduce air bubbles: Use a heat gun on a low setting to gently remove any air bubbles that rise to the surface of the resin. Hold the heat gun a few inches away and keep it moving to avoid overheating the resin.
- Curing: Leave the mirror undisturbed in a level place for the recommended curing time specified by your resin kit (typically 12-24 hours or more).
- Remove the tape: Carefully peel off the painter's tape once the resin is fully cured.
- Sanding (Optional): If there are rough edges on the cured resin, you can lightly sand them with fine-grit sandpaper for a smoother finish.
Tips
- Work in a warm room (around 70°F) for optimal curing.
- If you plan on using multiple colours, it's helpful to mix and pour them in batches to avoid the resin curing before you're finished.
- Clean your mixing cups and stir sticks with rubbing alcohol right after use. Cured resin can be difficult to remove.
Types of Epoxy Resin Geode Wall Mirror You Can DIY
You can create several dazzling variations of DIY epoxy resin geode wall mirrors, each with its unique aesthetic:
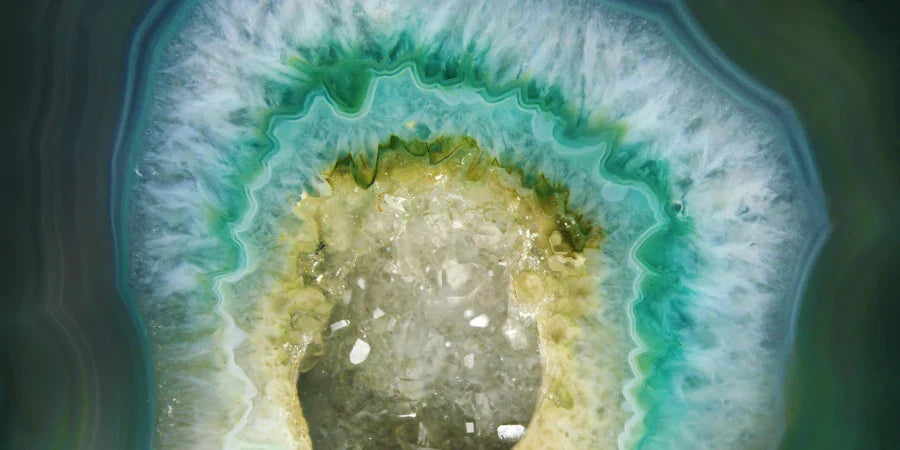
Classic Geode
- This is the most popular type, capturing the natural beauty of geodes with swirling colours and embedded "crystals."
- Use a combination of blues, greens, teals, whites, and gold for a realistic geode look.
- While the resin is still wet, strategically add crushed glass or crystals of various sizes for a truly mesmerising effect.
Cellular Geode
- This contemporary design features a mesmerising, almost honeycomb-like pattern on the geode "crystal" formations.
- After pouring a thin-coloured base layer, lightly mist the surface with rubbing alcohol using a spray bottle. The alcohol disrupts the surface tension, creating the cellular marbling effect.
- Continue pouring coloured layers and manipulating them with tools like toothpicks or straws to create wispy patterns within the "cells."
Metallic Geode
- Add glamour with a metallic twist!
- Mix a small amount of metallic powder into a portion of your resin for a shimmery, geode "crystal" effect.
- Use this metallic resin and other coloured resins to create a stunning geode design. Popular choices include gold, silver, or even copper.
Layered Geode
- This method enhances the perception of depth and dimension in your geode wall mirror.
- Layer different colored resins sequentially, letting each coat partially harden before applying the next one. This technique produces a layered look that resembles the natural formation of geodes.


