

How To Make Acrylic Pour Art Coasters: A Step-By-Step DIY Tutorial
Acrylic pour art coasters are a captivating form of art that allows individuals to create stunning, one-of-a-kind artwork for home decor or thoughtful gifts. The mesmerising patterns and vibrant colours achieved through acrylic pouring make it a popular choice for DIY enthusiasts and beginner artists.
The fluidity of this art form lends itself to endless creativity, making each coaster a unique work of art. These coasters can add a personal touch to any living space or serve as delightful presents for friends and family.
Consider joining a resin art workshop to learn more about the techniques and possibilities of acrylic pouring. By following this comprehensive blog, you will feel empowered and confident in your ability to master this attractive art form from start to finish. So, let's get started!
Essential Materials Required
When it comes to creating stunning acrylic pour art coasters, having the right materials is crucial for achieving the best results. Here's a list of the essential items you'll need:
- Acrylic Paint: Select a variety of colours to bring vibrant and dynamic hues to your coasters. Opt for high-quality acrylic paints to ensure rich pigmentation and optimal blending.
- Pouring Medium (Floetrol): This essential component helps to achieve the perfect consistency for your paint, allowing it to flow smoothly and create mesmerising patterns. Floetrol is widely favoured for its effectiveness in acrylic pouring techniques.
- Resin: For a glossy and professional finish, Resin is ideal for coating your coasters. It enhances the vibrancy of colours and provides a durable, protective layer.
Preparing the Paint
Achieving the right consistency with the acrylic paint is crucial to creating stunning acrylic pour art coasters. The correct consistency ensures that the paint flows smoothly and creates beautiful, intricate designs on the coaster surface.
To begin, gather your preferred acrylic paint colours and a pouring medium, such as Floetrol or Liquitex Pouring Medium. The pouring medium helps maintain the paint's stability and vibrancy while allowing it to flow seamlessly across the coaster. Here's a simple step-by-step process to prepare your paint:
- Start by pouring the required amount of acrylic paint into individual cups based on the colours you intend to use.
- Add the pouring medium to each cup of paint, ensuring that you maintain a consistent ratio for each colour. A common ratio is approximately 1 part paint to 2 parts pouring medium, but this can be adjusted based on the desired fluidity of the paint.
- Use a stirring stick or palette knife to thoroughly mix the paint and the pouring medium until you achieve a smooth and fluid texture. It's essential to ensure that there are no lumps or clumps in the mixture.
By carefully preparing your paint with the appropriate consistency, you set the foundation for creating visually captivating acrylic pour art coasters.
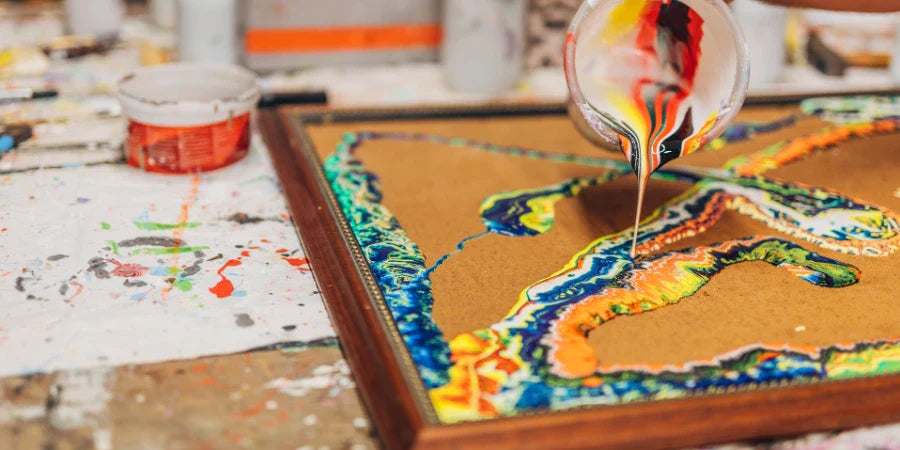
Pouring Techniques
While creating acrylic pour art coasters, the pouring techniques play an important role in defining the final outcome. By exploring different pouring techniques, you can explore your creativity and produce eye-catching patterns on the coaster surface. Here's how you can master the art of pouring:
Technique Variations
Experiment with various pouring techniques such as the “dirty pour,” “flip cup,” or “swipe technique” to achieve unique and mesmerising designs. Each method offers distinct results, allowing you to personalise your coasters according to your artistic vision.
Paint Quantity
Guiding the amount of paint to pour onto each coaster ensures that you understand the importance of balance. Too much paint can lead to excessive spreading, while too little may result in incomplete coverage. Finding the right quantity is key to achieving desirable results.
Colour Manipulation
Get into the art of manipulating colours to create stunning effects on your coasters. You can try different methods like blending, swirling, or layering colours to produce complex patterns and gradients. Understanding colour manipulation can empower you to craft visually captivating coasters.
Finishing Touches and Clean-up
After pouring the paint onto the coasters, it's important to take some additional steps to achieve a clean and polished finish. This section will cover two key aspects of the finishing touches and clean-up process: using a silicone mat and tidying up the edges and bottoms with a palette knife.
Using a Silicone Mat
When pouring paint onto the coasters, there may be some excess drips that can create a mess. To prevent this, place a silicone mat or a plastic liner underneath the coasters before starting the pouring process. The mat will catch any drips, making clean-up much easier afterwards. It also helps in keeping your work area clean and free from unwanted paint splatters.
Tidying up with a Palette Knife
Once the poured paint has settled on the coasters, you may notice some uneven edges or drips along the sides or bottoms. To achieve a clean and professional finish, gently run a palette knife along the edges and bottoms of each coaster. This will help in removing any excess paint and create crisp lines.
Using these techniques, you can guarantee that your acrylic pour art coasters have a neat and polished appearance. Taking the time to tidy up any imperfections will enhance the overall aesthetic of your coasters. Once you have finished tidying up, allow the coasters to dry completely before moving on to the next step.
Applying the Resin Finish
While creating acrylic pour art coasters, applying a resin finish serves multiple purposes. Not only does it enhance the vibrancy of colours, but it also provides a protective, glossy topcoat that adds a professional touch to the finished coasters. Here are some simple steps to apply resin finish:
Preparing the Resin Mixture
To begin the process, it's essential to prepare the resin mixture with precision. This involves following the manufacturer's instructions for the resin product being used and ensuring that the proportions are accurate. Arts Shala is a popular choice for its high-quality finish and ease of use.
Pouring and Curing the Resin
Once the resin is ready, carefully pour it over each coaster surface, ensuring even coverage. It's important to allow the resin to cure in a dust-free environment for the recommended amount of time. This step is necessary for achieving a flawless, glossy finish that will truly make the colours pop.
Adding Cork Backing for Protection
In addition to enhancing the aesthetics of the coasters, applying a resin finish also adds durability, making them suitable for long-term use. To further protect surfaces from scratches and provide grip, consider adding cork backing to the coasters once the resin has fully cured.
Following these steps and paying attention to detail during the resin application process, you can take your acrylic pour art coasters to professional quality, ready to be displayed or gifted with pride.
Read Also - What Is The Best Way To Seal Resin Before Painting?
Conclusion
Now that you have learned the basics of creating acrylic pour art coasters, it's time to explore your creativity and start making your unique designs. Practice makes you perfect, so don't be afraid to experiment with different colours, techniques, and pouring styles.
Acrylic pouring isn't just limited to coasters. You can also use this technique on canvas, wood panels, or even furniture to create stunning abstract pieces. Why not mix acrylic pouring with other art techniques like resin art or alcohol ink? The possibilities are endless, and you might discover a whole new way of expressing yourself through art.
If you're eager for more knowledge and want to get deeper into the world of resin art and acrylic pouring coasters, Contact Us on Arts Shala for online courses that offer in-depth information, expert tips, and a supportive community of fellow artists.


